Brake Side Swingarm Replacement S-XC-S00023

Removal Procedure

1. Raise and support the scooter.
2. Using an allen wrench (1) loosen the set screw and remove the brake side swingarm chrome cap (2).

Image 446

3. Remove the lower right rear shock bolt (2).

4. Remove the rear brake caliper bolts (1) and the brake hose bracket screw (3).
Caution: Do not depress the brake lever with the brake caliper removed from the brake rotor. Damage to the brake system
may result. If brake system damage occurs and is not repaired, scooter damage and/or personal injury or death may
result.
Notice: Support the brake caliper with heavy mechanic wire, or equivalent, whenever it is separated from its mount and the
hydraulic flexible brake hose is still connected. Failure to support the caliper in this manner will cause the flexible brake
hose to bear the weight of the caliper, which may cause damage to the brake hose and in turn may cause a brake fluid
leak.
5. Remove the brake caliper for the right side swingarm.
6. Remove the axle nut, lock washer and flat washer (5) from the axle shaft.

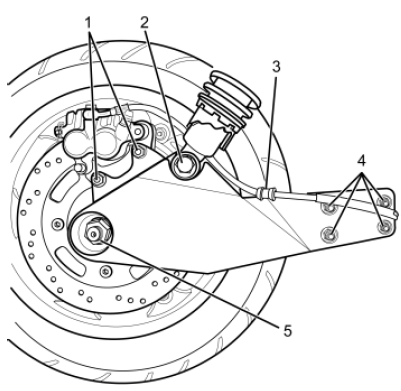
7. Remove the front swingarm nuts (4).

Image 447

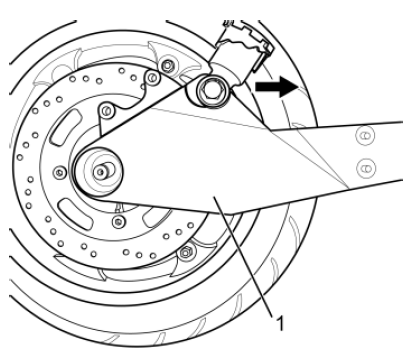
8. Pivot the rear shock forward and remove the brake side swingarm (1).

Image 448


Installation Procedure

1. Pivot the rear shock back and install the swingarm (1).

2. Install the front swingarm nuts (4) and tighten to 23 N•m (17 lb ft)

3. Apply Castrol Optimal Paste on the threads of the axle nut.

4. Install the flat washer, lock washer and axle nut (5) onto the axle shaft, tighten nut to 145 N•m (107 lb ft)

5. Install the brake caliper onto the right side swingarm.

6. Install the rear brake caliper bolts (1) and the brake hose bracket screw (3). Tighten caliper bolts to 25 N•m (18 lb ft)

7. Install the lower right rear shock bolt (2). Tighten bolt to 57 N•m (42 lb ft)

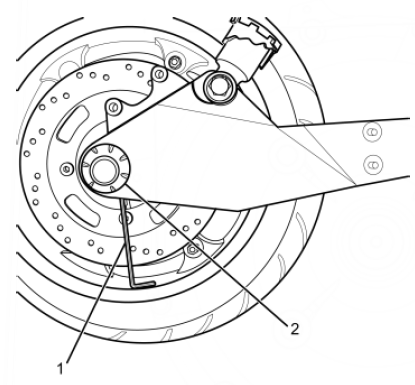
8. Install the brake side swingarm chrome cap (2) and using an allen wrench (1) tighten the set screw.


This article was helpful for 5 people. Is this article helpful for you?